It can be irritating to have to enter your login credentials—your username and password—every time you turn on your Windows 10 computer. Fortunately, there are several ways to automatically login to Windows 10, saving you precious seconds.
You can do this by changing a few settings in Windows 10 or by using the registry editor. We’ll also show you how to revert those settings in case you ever want to go back to entering your credentials every time you log into Windows 10.

Why You Might Want to Set Up Windows 10 to Login Automatically
Setting up Windows 10 to login automatically is certainly less secure than requiring users to login by typing in a password or PIN. There are, however, some situations when you might prefer your computer to log you in automatically. * You want to run a Steam Link, and you don’t want to have to run over to your other computer to enter your Windows 10 credentials every time you want to turn on your Steam Link.
- You use your own laptop for school, and you’re always running late so you want your computer to boot up as fast as possible without having to enter your password.
- You’re the only person in your household — no one else will ever use your computer.
- You’re terrible at remembering your password.
Despite the reasons above, you’ll probably find that you don’t want to set up Windows 10 to login automatically forever. Eventually, you’ll want to go back to having Windows 10 require you to login with your username/password or PIN. We also recommend doing this for a short period of time for the reasons mentioned below.
The Downsides to Windows 10 Logging You in Automatically
Before we begin, a few quick notes about why having Windows 10 log you in automatically might not be the best idea.
- You’re likely to forget your password if you never need to type it in.
- If your computer belongs to your school or employer, you may not even have administrative privileges on your computer, and, therefore, you won’t be able to change the settings necessary to set up Windows 10 to login automatically.

You have been warned. Now let’s look at how to set up your computer to login automatically.
Set Up Windows 10 to Login Automatically in the Settings Menu
This is the easiest way, but it doesn’t always work.
- In the Windows search bar, type Settings and press Enter.
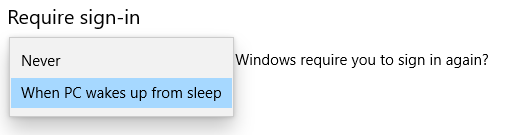
- In the **Find a setting **box, type Sign-in options and select it from the list.
- Under Require sign-in, set it to Never.
If you follow the steps below and you’re still prompted for your user name and password (or your PIN) when you restart Windows, try the next method.
Set Up Windows 10 to Login Automatically via User Account Settings
Access your user account settings for the simplest way to automatically log into Windows 10.
- In the Windows 10 search box or the Run command box (Windows key + R), type **netplwiz **or control userpasswords2.

- Press **Enter**. * A User Accounts window will open.
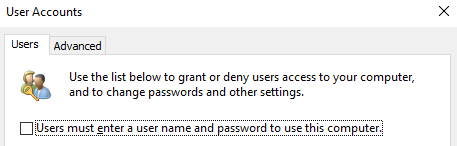
- Uncheck the box next to “**Users must enter a user name and password to use this computer.**” If you don’t even see the checkbox at all, then skip down to the registry method, which should work. * Press **Enter**. * A new box titled “Automatically sign in” will appear. * Enter in your user name and password. * Confirm your password. * Select the **OK** button.
Once you restart your computer you’ll see the results. You will now automatically be logged into your account.
Use the Registry Editor to Set Up Windows 10 to Login Automatically
Alternatively, you can use the Registry Editor to set up Windows 10 to login automatically when you turn on or restart your computer. Remember, bad things might happen if you do this incorrectly, so back up the registry before you start.
Note that you will need to enter the username and password into the registry for the account that you want to log into. If you’re using a Microsoft account to log into the PC, simply use the email address as the username.
- Type registry editor in the Windows search box and select Registry Editor from the search results.( Alternatively, launch the Run command box by pressing Windows key + R. Then enter regedit and select the OK button.)

- If asked, “Do you want to allow this app to make changes to your device?” select **Yes.** * Type the following into the search box at the top of the Registry Editor: **ComputerHKEY_LOCAL_MACHINESOFTWAREMicrosoftWindowsNTCurrentVersionWinlogon**. (Alternatively, drill through the folder structure on the left to the right folder.)
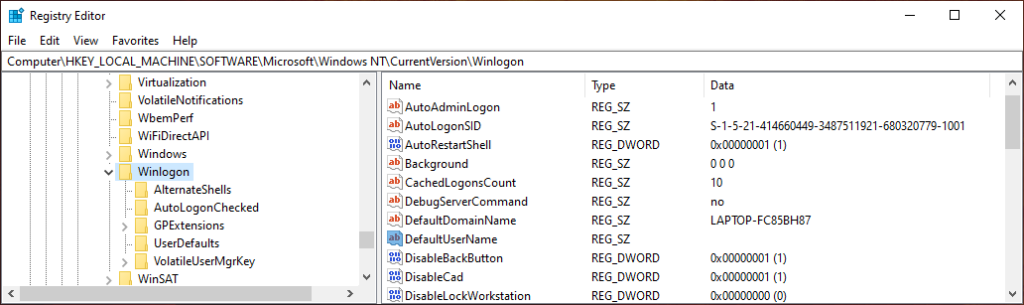
- In the right pane, double-click on **DefaultUserName**. If there is no DefaultUserName entry, create one by selecting **Edit **> **New **>** String Value**. Name it **DefaultUserName** and select **Enter**. * Type in your user name and select the **OK** button. * Next, double-click on **DefaultPassword**. (If there is no DefaultPassword entry, create one by selecting **Edit **> **New **>** String Value**. Name it **DefaultPassword** and select **Enter**. Now you can double-click on the DefaultPassword entry.)
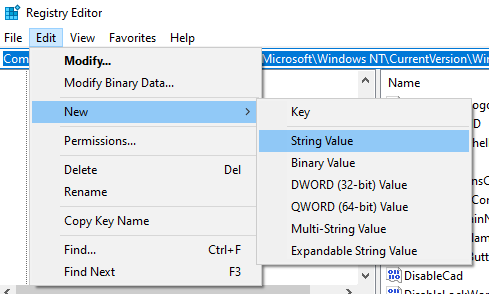
- Enter your password and select the **OK** button. * Next, create an entry for automatic logins by selecting **Edit **> **New **>** String Value**. * Name the new string value **AutoAdminLogon **and select the **OK** button. * Double-click on the new **AutoAdminLogon** entry. * In the **EditString** box, enter the number “**1**” in the **Value data **field. * Select the **OK** button. These are the three registry values you have to add shown below.

- Exit the Registry Editor.
When you restart your computer, your changes will take effect, and you’ll automatically login to Windows 10. If you have a different method you’ve used to log into Windows 10 automatically, let us know in the comments. Enjoy!