If you’re working with a MySQL database, then you’re already aware of the challenges you face in keeping your database secure. From database hacking attempts using SQL injections to brute force attacks, it’s difficult to keep your data safe, especially if you’re working with a database remotely.
There are ways to configure an SQL server to allow remote connections, but you need to be careful, as allowing remote connections on a MySQL server can make your database an easy target for hackers. If you want to allow secure, remote connections to a MySQL database, here’s what you’ll need to know.
**Before You Begin**
Before you make any changes to your MySQL database, it’s important that you backup your database, especially if you’re working on a production server (a server in active use). Any changes you make to your database, or the server hosting it, could result in serious data loss if something goes wrong.
You may also find that changes to your server’s connections may prevent you from accessing it afterward. If this happens, you may need to consult with a server administrator for further support. A good idea is to trial any changes on a locally-run MySQL server to check if your changes work before trying them remotely.
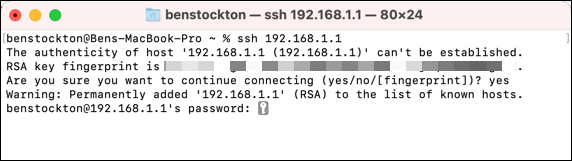
It’s also likely that if you’re making changes to a remote server, you’ll need a safe way to connect and make changes. SSH (Secure Shell) is often the best way to do this, as it allows you to connect to your remote server. You can also use SSH to connect to servers on your local network, such as those hosted on a Raspberry Pi.
This guide will lead you through the steps to configuring MySQL to allow remote connections, but you’ll need to ensure you have direct or remote access to the server hosting your MySQL server first.
Suppose you don’t have remote access to your server via SSH (for example). In that case, you won’t be able to configure your MySQL database to allow remote connections directly unless your root mySQL account already allows remote connections. So, you will need to establish this connection first before you can proceed.
Editing Your MySQL Configuration File
The first step in configuring MySQL to allow remote connections is to edit your MySQL configuration file. By this stage, this guide will assume you have already connected to the server, PC, or Mac hosting your mySQL database remotely and have console access.
Alternatively, you can configure a local MySQL server using an open terminal on Mac or Linux or a text editor on Windows.
- * To start, use your preferred console text editor to edit your MySQL database file. On Linux, type **sudo nano /etc/mysql/mysql.conf.d/mysqld.cnf into a terminal or SSH window to edit this file using the nano editor (assuming your MySQL database is in the default location). **

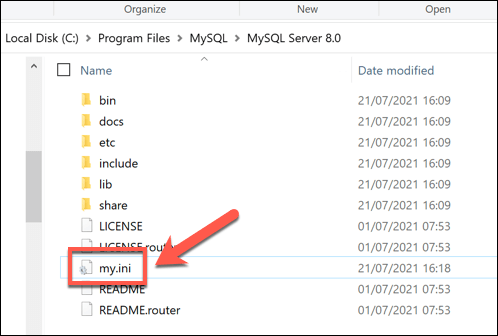
- If you’re running Windows, open File Explorer and access the folder containing your MySQL installation (eg. **C:/Program Files/MySQL/MySQL Server 8.0**). Open the **my.ini** file using your default text editor (eg. Notepad) by double-clicking the entry. If it isn’t there, create the file first.
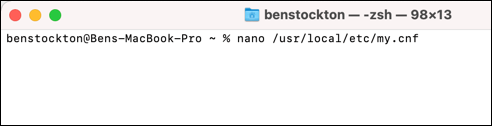
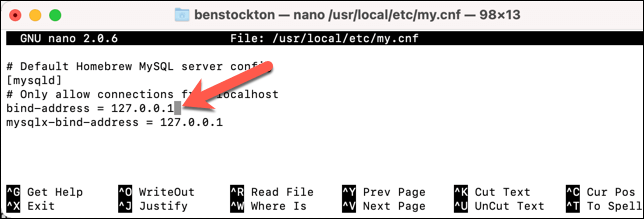
- On Mac, open a terminal window and type **sudo nano /usr/local/etc/my.cnf**. This is the default configuration file for MySQL if you’ve installed MySQL using homebrew.
The locations referenced above are the default locations for MySQL configuration files. If these commands don’t work, you’ll need to search for the relevant files (my.cnf, mysqld.cnf, or my.ini) manually to locate the relevant file path.
Setting a Safe Bind-Address IP Range
- Once you’ve opened the MySQL configuration file for your server, use your keyboard’s arrow key to reach the bind-address section of the file. This IP range limits the connections to your database, which is typically set to only allow connections from the local machine or server using 127.0.0.1.
- If you want to configure your MySQL database to allow connections from devices using your current internet connection, find your public IP address first, then replace **127.0.0.1** with that IP address. Alternatively, replace it with an IP address for the device or server you wish to allow connections from.

- In some circumstances, you may wish to allow **all** remote connections to a MySQL database. This carries **extreme risk** and shouldn’t be used on a production server. If you want to allow this, however, replace **127.0.0.1** with **0.0.0.0**.

- Make note of the **port **value in the **Basic Settings** section. This will be required in the next section. If it isn’t visible, the default value will be used, which is port **3306**. You can add your own port by typing **port = xxxx** on a new line, replacing **xxxx** with a suitable port value.
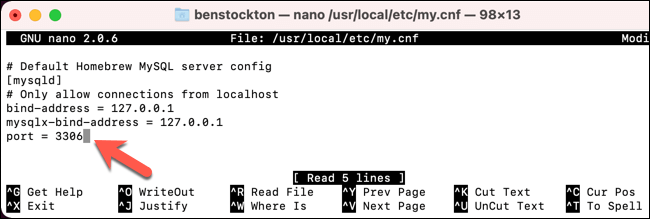
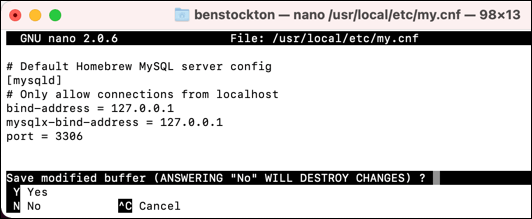
- Once you’ve configured the **bind-address **in your MySQL configuration file, save the file. If you’re on Linux, select **Ctrl + O **and **Ctrl + X **to do this. On Mac, select **Command + O **and **Command + X**. Windows users can save by selecting **File **> **Save**.
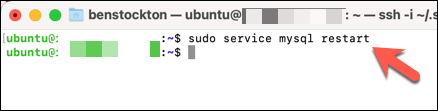
- Next, Linux and Mac users can restart MySQL by typing **mysql.server stop && mysql.server start **or **mysql.server restart**. You may need to elevate the command using sudo (eg. **sudo mysql.server restart**) and use the appropriate path to the mysql.server file (eg. **/usr/local/bin/mysql.server**).

- If the above command doesn’t work, try **sudo service mysql restart **instead.
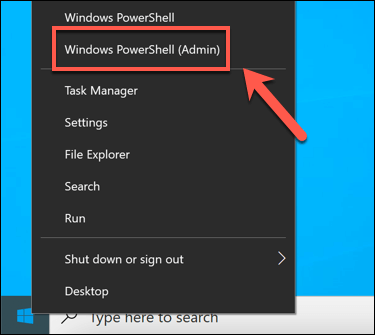
- To restart MySQL on Windows, open a new PowerShell window by right-clicking the Start menu and selecting **Windows PowerShell (Admin)**. In the PowerShell window, type **net stop mysql80 **followed by **net start mysql80**, replacing **mysql80** with the correct service name on your PC.
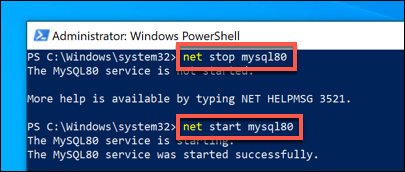
If you’re unsure of the correct service name on Windows, type net start to find it.** **If you can’t reload your configuration, restart your server and reload MySQL manually (if necessary) instead.
Configuring Your Firewalls
At this stage, your MySQL database should allow remote connections from devices using the IP address you set as the bind-address value in your MySQL configuration file (or from all devices if you set this value to 0.0.0.0 instead). However, connections will still be blocked by your device or network firewall.
Most servers and PCs use a firewall to block connections unless access to a specific port is granted. The steps to configure this will vary, depending on whether you’re running MySQL on Windows or Linux. Mac firewalls are disabled by default, so you shouldn’t need to complete any additional steps here.
Configure Linux Firewalls
Many Linux servers use iptables as the default firewall utility. You can configure it by following the steps below.
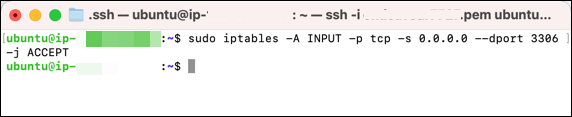
- Open a terminal or SSH connection and type sudo iptables -A INPUT -p tcp -s X.X.X.X –dport YYYY -j ACCEPT. Replace X.X.X.X with the IP address for the device you wish to allow MySQL connections from, and replace **YYYY **with the matching port value from your MySQL configuration file (eg. 3306).
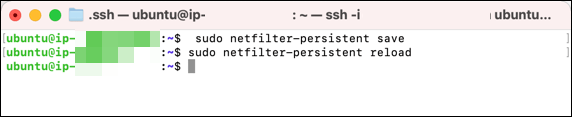
- This will configure the firewall temporarily. If you’re using a Debian or Ubuntu-based Linux server, make this change permanent by typing **sudo netfilter-persistent save** and **sudo netfilter-persistent reload **into the terminal or SSH window.
If iptables isn’t the default firewall tool for your Linux distribution, you’ll need to consult your distribution’s user manual for more information. If certain packages (such as netfilter-persistent) are unavailable, use your distribution’s software repository tool to install it (eg. sudo apt install netfilter-persistent).
Configure Windows Firewalls
If you’re using a Windows PC or server to host your database, you can configure your firewall using these steps:
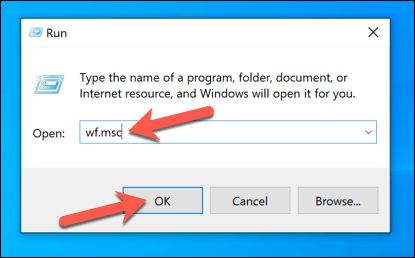
- Right-click the Start menu and select Run.
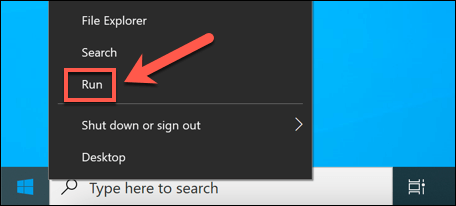
- In the **Run** box, type **wf.msc** and select **OK**.
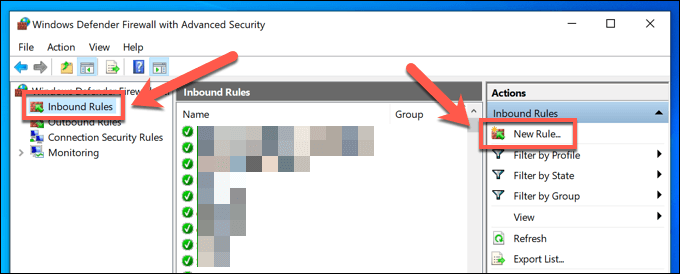
- In the **Windows Defender** window, select **Inbound Rules **> **New Rule**.
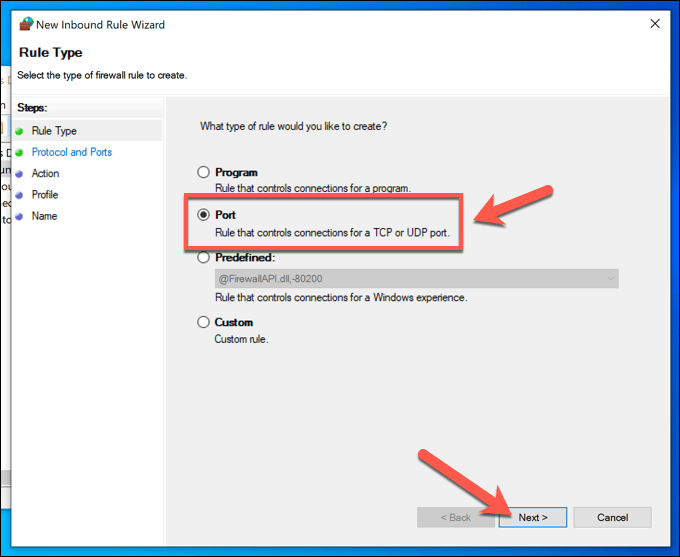
- In the **New Inbound Rule Wizard** window, select **Port **> **Next**.
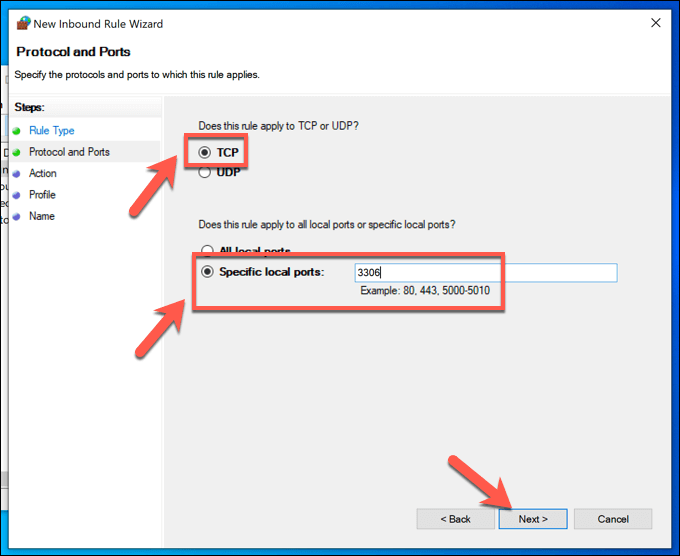
- At the next menu, select **TCP** from the options, type **3306 **(or whichever port value is listed in your MySQL configuration file), then select **Next**.
- At the **Action** menu, leave the default option to **Allow the connection** enabled, then select **Next**.
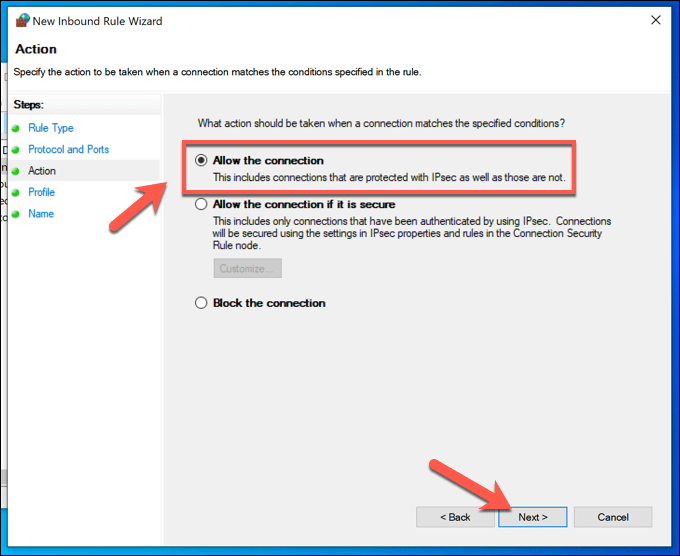
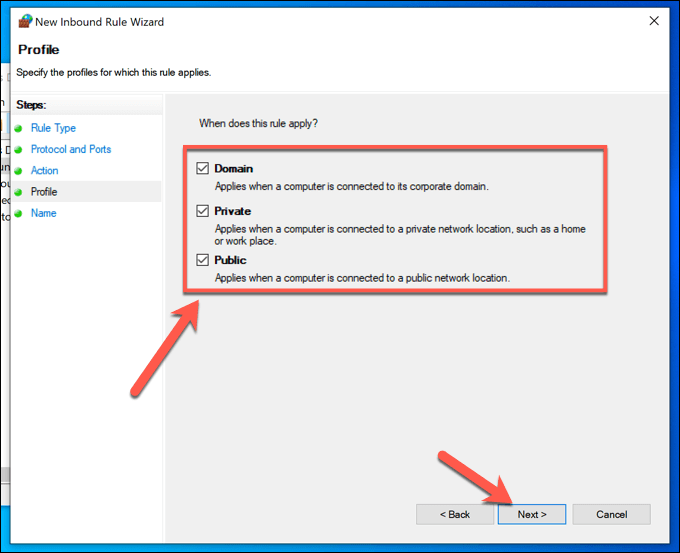
- Confirm that you want the rule to apply to all network types, then select **Next**.
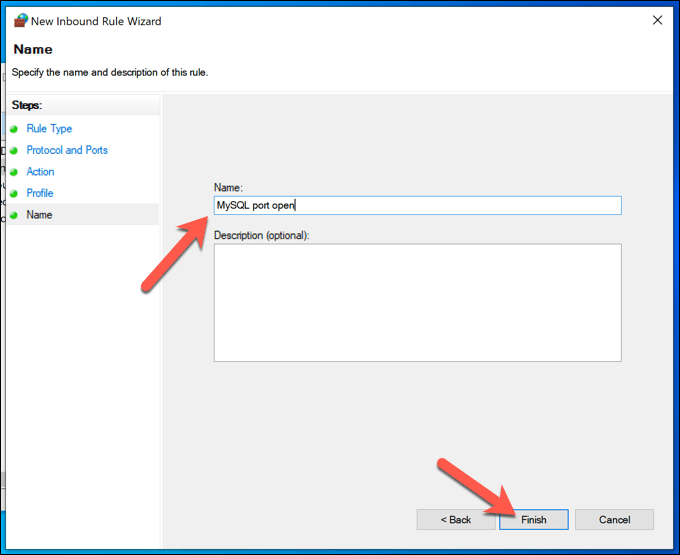
- Type a descriptive name for the rule (eg. **MySQL**) in the port provided, then select **Finish** to add it to your list of firewall rules.
If you have trouble connecting, repeat these steps above, making sure to create a new **outbound rule **in your firewall settings using the same details (port 3306, etc). You may also need to configure your local network router to open the necessary blocked ports to allow inbound and outbound connections to your database.
Connecting to a Remote Server Using MySQL
After configuring your MySQL database to allow remote connections, you’ll need to actually establish a connection to it. You can do this using the mysql command (**mysql.exe **on Windows) from a terminal or PowerShell window.
If you’re running Windows, you will need to make sure that MySQL is installed locally before you begin. Mac users can install MySQL using homebrew from the terminal (brew install mysql), while Linux users can use their local app repository (eg. sudo apt install mysql) to install the necessary packages.
Connecting to MySQL on Linux or Mac
- To connect to your remote MySQL server on Mac or Linux, open a new terminal window and type mysql -u username -h X.X.X.X:XXXX -p. Replace **X.X.X.X:XXXX **with your remote server IP address and port number (eg. 100.200.100.200:3306) and username with your MySQL username.

- When prompted, confirm your password. If the connection is successful, a success message will appear in the terminal.
**Connecting to MySQL on Windows**
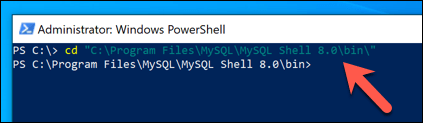
- To connect to a remote MySQL server on Windows, open a new PowerShell window by right-clicking the Start menu and selecting **Windows PowerShell (Admin)**.
- In the new PowerShell window, type **cd “C:Program FilesMySQLMySQL Workbench 8.0**” to enter the correct folder, replacing this directory with the correct installation directory on your PC. For example, if your version of MySQL is 8.0.1, use the **MySQL Workbench 8.0.1** folder instead.
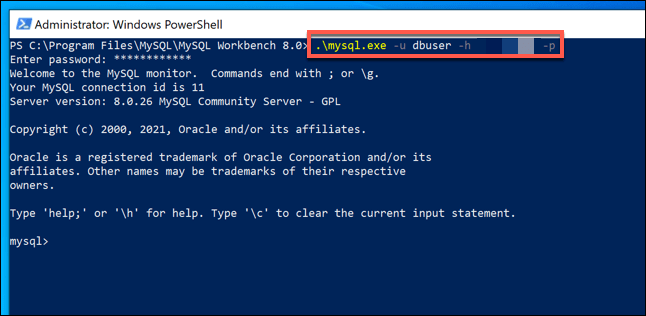
- From there, type **.mysql.exe -u username -h X.X.X.X:XXXX -p**. Replace **X.X.X.X:XXXX **with your remote server IP address and port number (eg. **100.200.100.200:3306**) and **username** with a MySQL username that allows remote access (such as **root**). Follow any additional on-screen instructions.
- Provide your password, when prompted, to complete the sign-in process and access your MySQL database remotely.
If this doesn’t work, connect to the server or PC hosting your MySQL server using SSH (or access it directly) using these steps and using the -h localhost argument. You can then create a suitable user account by following the steps below.
Allowing Remote User Access to a MySQL Database
By this point, you should be able to connect to your MySQL server remotely using your server’s root user account or another user account with elevated privileges. As this level of access is unsafe, you may prefer to create a more restricted account for accessing your MySQL database.
This account will have limited access to your MySQL server, allowing it to interact with only selected databases. It won’t be able to make more serious changes, such as accessing other database data, creating new user accounts, etc.
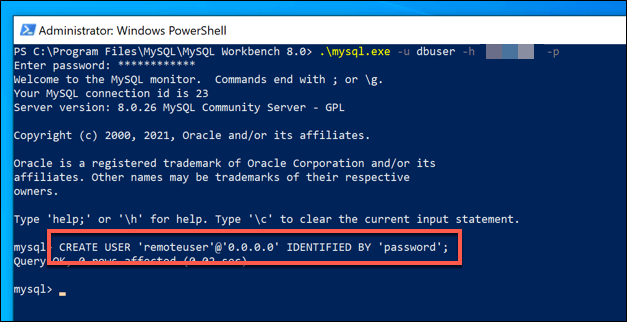
You’ll need to have the ability to sign into your MySQL server remotely. If you can’t use your root account remotely, you’ll need to access your server’s shell using the mysql command via a remote SSH connection or by directly accessing the PC or server hosting the server.
- In your remote MySQL shell (using the mysql tool), type **CREATE USER “username”@”x.x.x.x” IDENTIFIED BY “password”; **and select Enter. Replace **username **with the username you wish to create, **x.x.x.x **with the IP address you wish to connect from, and password with a suitable password.
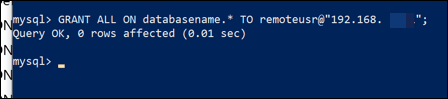
- You’ll need to grant your new account with the necessary permissions. To do this, type **GRANT ALL ON databasename.* TO username@”x.x.x.x”; **and replace **databasename, username, **and **x.x.x.x ** with the correct details. If you wish to, replace **databasename** with ***** to grant it access to all databases.
With access granted, use the steps in the section above to connect to your server remotely using your new account (eg. mysql -u username -h X.X.X.X:XXXX -p).
Securing Your Database Data
Whether you’re working with MySQL or another type of SQL database, it’s important to keep your connections secure to maintain your data security. A good way to do this is to generate SSH keys for remote access to your server, rather than relying on outdated (and easily guessable) passwords.
If you’re worried about data loss, you can easily back up your database online. Most databases are run using Linux servers—you can automate a Linux file backup easily. If you’re running MySQL on Windows, you can set up a similar automatic backup system for Windows, allowing you to restore your data in an emergency.