A mouse is a handy tool, but point-and-click is a waste of time. You knew that, so you went and learned the best keyboard shortcuts for Office and Windows already.
But maybe some repetitive tasks don’t have shortcut keys. Wouldn’t it be great if you could create your own keyboard shortcuts in Microsoft Office? Well, you can.

How to Create Keyboard Shortcuts in Microsoft Office
Let’s go through these steps in Word first. The steps are identical in Excel and PowerPoint on the desktop. Scroll down to see how to do this in Outlook.
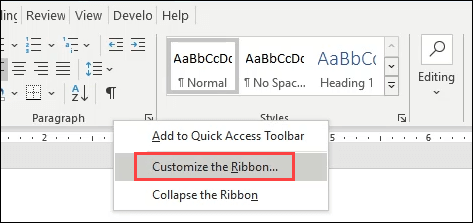
- * Right-click on any grey space in the ribbon area and select Customize the Ribbon.
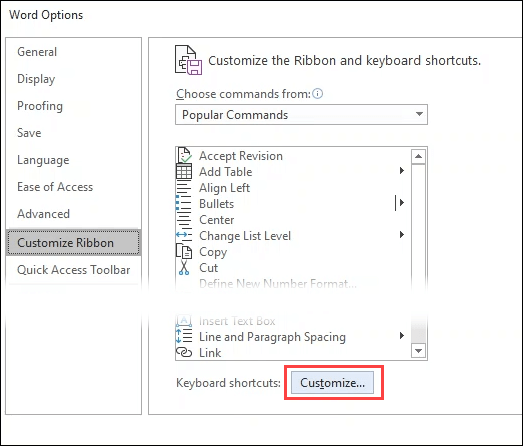
- The **Word Options **window will open. Select **Customize **next to **Keyboard shortcuts** near the bottom of the window.
- The **Customize Keyboard** window will open. Look in the **Categories **area to narrow down to a tab which has the command you want to create a shortcut for. That tab’s commands will show in the **Commands **area on the right. Select the command you want. In this example, we’ve selected **FileSendPdf**, as it would be very helpful to send a Word document as a PDF with a simple keystroke combination. If the command already has a keyboard combo, it will show in the **Current keys **area.
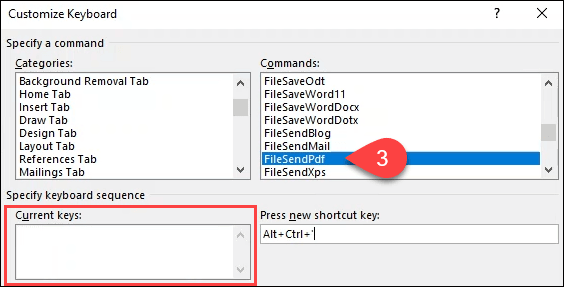
- To set a new shortcut key combination, place the cursor in the **Press new shortcut key** field, then press the key combo you want to use on your keyboard. Make a note of what shows under the **Current keys** area next to **Currently assigned to**. If anything but **[unassigned]** shows there, try another key combo.

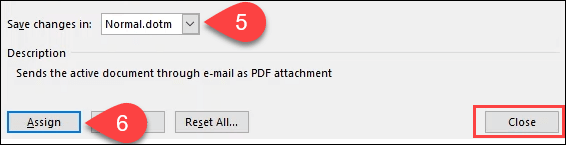
- To use this key combo for all future documents, leave **Normal.dotm **selected in the **Save changes in **box. To apply the key combo to only this document, choose it in the drop-down box. * Select the **Assign **button to apply the settings, then close the Customize Keyboard window. Press **OK **to close out the Word Options window. Try your new keyboard shortcut combination.
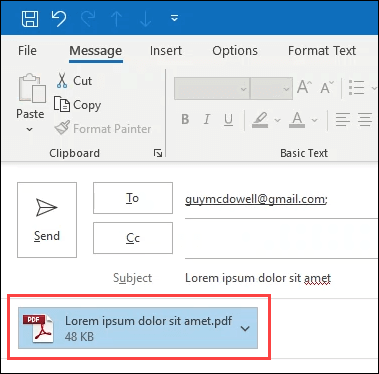
The **FileSendPdf **shortcut will automatically convert the document into a PDF, create a new email message in Outlook, attach the PDF, and give the email a Subject. One keystroke instead of a dozen or more point-and-clicks with a mouse is an incredible timesaver.
How to Clear Custom Keyboard Shortcuts in Microsoft Office
You may wish to get rid of all the custom keyboard shortcuts you’ve made in an Office app. It’s simple to do.
- Right-click on any grey space in the ribbon area and select Customize the Ribbon.
- The **Word Options **window will open. Select the **Customize **button** **in the bottom-left area of the window. The **Customize Keyboard **window will open.
- To remove the key assignments from all future documents, leave **Normal.dotm **selected in the **Save changes in **drop-down. To remove them only from this document, choose the document in the dropdown instead. Near the bottom-left, select the **Reset All **button.
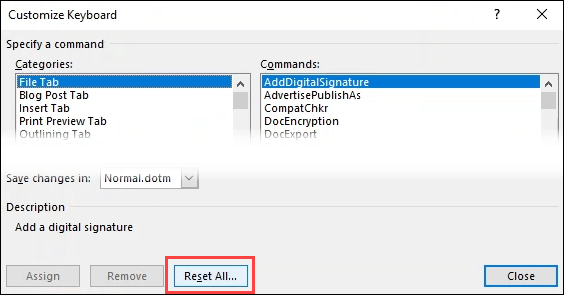
- It will ask, **Are you sure you want to reset the key assignments? This action will remove all keys currently assigned to macros and styles in Normal.dotm**. Note that at the end of that warning, it will read either Normal.dotm or the document you’ve selected. Select **Yes **to confirm the reset.

How to Create Keyboard Shortcuts in Microsoft Outlook
Of all the Microsoft Office apps, Outlook is probably the one in which you spend the most time. It makes sense to create some custom keyboard shortcuts to get things done faster.
Unfortunately, since Outlook 2016, it doesn’t allow you to make keyboard shortcuts as we can in Word, Excel, and PowerPoint. So what are your options?
It’s a workaround, but you can create **Quick Steps **and assign key combinations to them. This won’t give you the ability to create a shortcut key combo for everything in Outlook, but it can meet most of your needs. There is a limit of nine key combos that you can assign to custom Quick Steps.
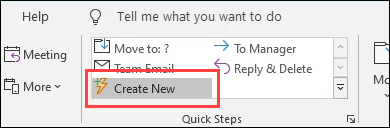
- Select **Create New **in the **Quick Steps **section of the **Home **tab in Outlook.
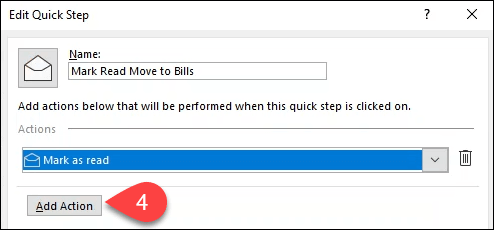
- The **Edit Quick Step **window will open. Enter a descriptive name in the **Name** field. * Choose from one of the predefined actions in the **Choose an Action **drop-down menu. In this example, let’s go with **Mark as read**.
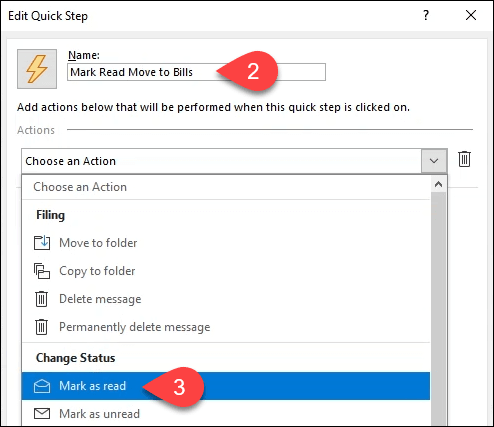
- String actions together by selecting the **Add Action **button under the previous action.
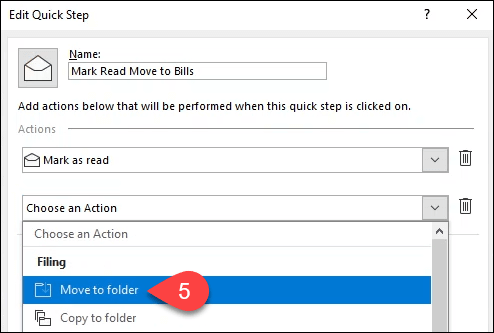
- Select **Move to folder**.
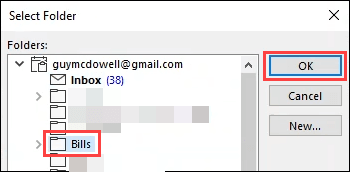
- The **Select Folder **window will open. Find and select the folder to which you want this Quick Action to move the email. We select the folder **Bills **for this example. Select **OK **to close the window.
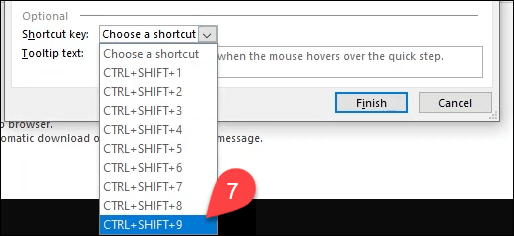
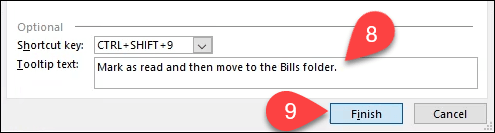
- Select a key combo in the **Shortcut key** drop-down. Note that it’s limited to nine selections.
- Add a description of what the Quick Step does in the **Tooltip** text box. When you hover over the Quick Step later, this will appear to remind you of what it does.
- Select **Finish **to complete creating the Quick Step. You’ll now see the **Mark Read Move to Bills** Quick Step in the Outlook ribbon. Test it using the shortcut key combo you chose in step 7.
If you want to go a step further, you can create Outlook Desktop shortcuts using command line switches to make common tasks easier to do.
Practice Your Keyboard Shortcuts
Now you can create your own Microsoft Office shortcut keys. Print out a list of your most-used shortcuts and keep them beside your monitor. After a few days, you won’t need the cheat sheet anymore. Add in the command line switch shortcuts and it will boost your Microsoft Office productivity in no time.